Looking to make something unique for Mother’s Day? Want to create something from the heart and have a great time making?
Well Cosy Owl have put together a brilliant guide on how to make your own bespoke Mother’s Day candle set that any mother is sure to love! The guide includes everything you need to make the gift set and the step-by-step process will mean that you can’t go wrong. Enjoy!
Ingredients
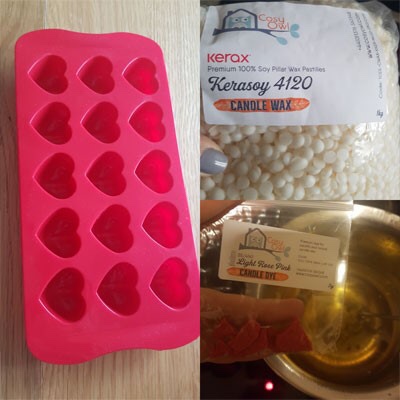
• 650g of either Kerawax 4105 or Kerasoy 4130
• 100g of either Kerawax 4600 or Kerasoy 4120
• Heart shape silicone mould
• 3g of 39/4327 Pink Dye
• 3g of 35/4141 Light Rose Pink Dye
• 100ML bottle of a Fragrance Oil of your choice
• 4 TCR 27/16 Wick
• 4 Glue Dots
• 4 20CL Karen Round
• (optional extra Silver Lid for the 20CL Karen Round)
• 10Porex Natural Reeds
• Silver Metal Shelled Diffuser Cap
Method
Step 1: Making the melts
Get started by pouring 50g of Pillar wax into your melt pot (our Bain Marie is perfect for this.) Make sure not to allow the temperature of the wax to exceed 70-75°C! When the wax has melted, add either a very small amount of the Pink or the Light Rose Pink Dye and then gently stir until the dye seems to have become evenly distributed throughout the mixture.

Step 2: Fragrance and cooling
If you are adding a scent to your candles then now is the time to add the fragrance oil. Add around 5ml of your selected fragrance oil below the flash point temperature for that scent. After this, allow the wax to cool to around 55-60°C then transfer it into your pourer and slowly pour the wax into the moulds. This should only be around a third to a half of the way up the mould.

Step 3: Make the rest!
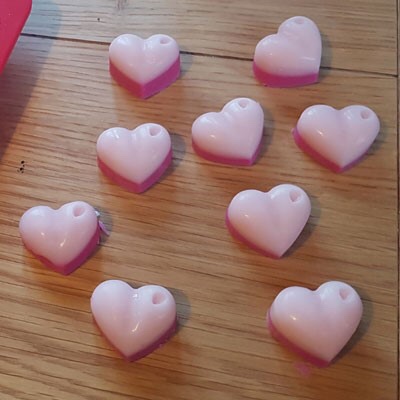
Repeat the above steps for your second colour on the heart melts, though make sure the first layer has cooled before pouring the second one. Leave these to cool to one side as you will need them later.

Step 4: Melting the wax for your candles
Take the container wax and place it into the burner. Melt the wax to approximately 70°C and, whilst itis melting, continue to the next step…

Step 5: Preparing your container
Now to prepare the container and get them candles ready! Take the glue dots and use them to hold down the sustainer into the glass in a central location. Now use the Wick Holder to keep this in place while you pour the wax in and allow the candle to set.

Step 6: Return to the wax
When the wax has melted, and the temperature has cooled, add around 30ml of the fragrance oil to the wax (keeping in mind the fragrance oil flash point.) Then, stirring gently, get ready to transfer 2/3 of the molten wax into your pourer. Evenly pour this wax into your prepared containers 2/3 of the way up and leave the wax to cool.
Step 7: Back to the hearts
While the wax in the above step is cooling, return to the hearts and remove them from their mould. Set these to one side whilst the wax is hardening and keep the remaining wax heated at a consistent temperature (approximately 60°C). Then make sure you have all the items for making your reed diffuser at the ready.
Step 8: The Diffuser
Pour the 50ml of Diffusol Oil into the Penny Diffuser Bottle. Follow this by adding 30-40ml of your chosen Fragrance Oil and then screw the cap on top of the bottle and add the reeds. After this your diffuser is pretty much done!

Step 9: Finishing touches
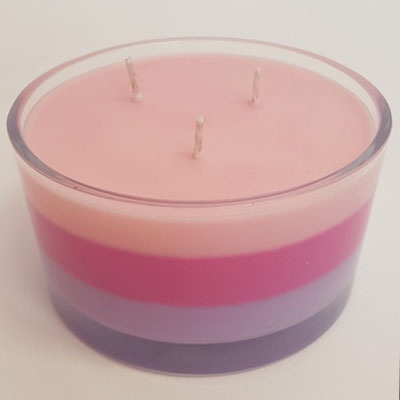
When the candles have cooled, place the heart melts on top of the candle in your chosen layout (we chose two melts per candle). When you’re happy with the placement of the heart melts, pour the remaining wax into the candles, making sure it doesn’t go over the top of the melts. Submerge the base of the hearts into the molten wax and leave the top layer of the melts visible above the wax.
With this done, leave the candles to cool for a minimum of 24 hours before doing anything else with them. After this, your candles will be ready for packaging and gifting! If you want to add an extra little touch to your gift set, why not have a go at making our 3-Wick Mother’s Day Candle with it’s own easy to follow guide.